Over the last few weeks I have been writing about solving a problem I have with my garden. I often forget to water my plants so I created a dashboard and notification system to help.
My dashboard and notification system are not much use if I cannot push moisture readings into AWS. So the next step in this project was to create the IoT services.
As I wrote in my earlier post, the AWS IoT service does much of the heavy lifting in this system. AWS IoT provides device authentication, communication and integration with other AWS services.
To build my garden monitoring system I have made use of three of the AWS IoT services.
The Device Gateway is the heart of the AWS IoT service. The Device Gateway is the Message Broker between devices and AWS services. There are three protocols supported by the device gateway:
MQTT — a lightweight publish/subscribe messaging protocol
HTTP — allows devices to push messages into the gatway via POST
MQTT over Web Sockets — allows browsers and mobile devices to message the gateway
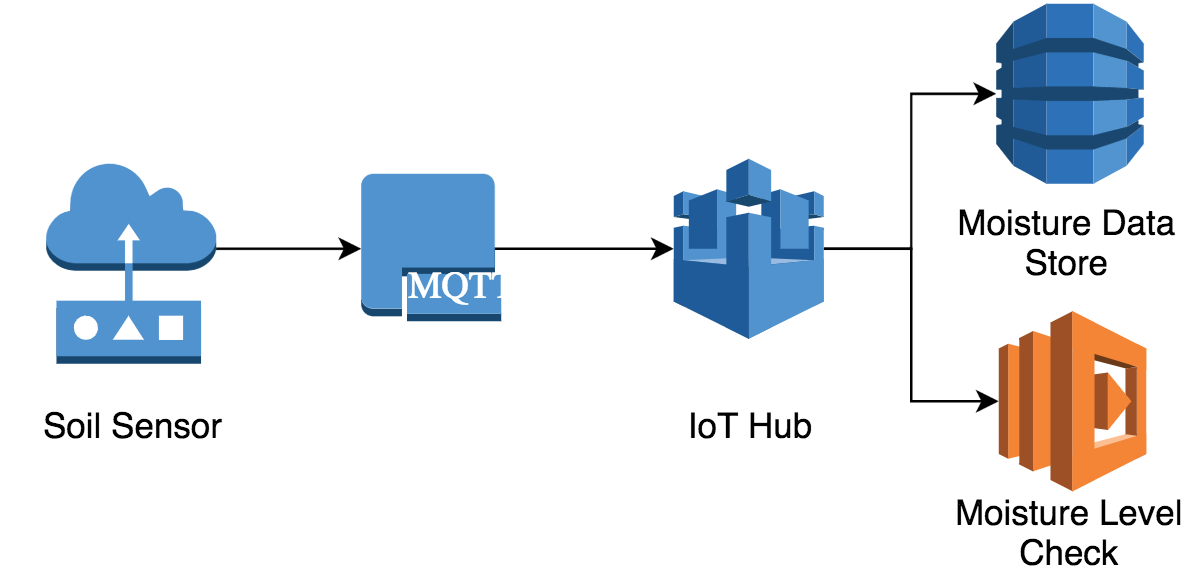
MQTT was designed for devices with limited power supplies and bandwidth. This makes it ideal the soil moisture sensor I want to build for my garden.
The Device Gateway requires authentication for all messages it recieves. There are a few options for authenticating messages. But, since I am using MQTT, I must authenticate messages with a X.509 certificate.
The Device Gateway uses mutual TLS authentication to validate the client certificate. When using X.509 certificates, the Device Gateway requires the use of TLS 1.2. As I found out, it is important to know this before selecting hardware for your project.
If the Device Gateway is the heart of AWS IoT, the Rules Engine is the brain. The Rules Engine processes, filters, transforms and acts upon incoming IoT messages.
Each IoT Rule contains a SQL statement. The SQL statement supports the following keywords:
FROM — the MQTT topic to listen to
SELECT — transforms the data in the incoming message
WHERE (optional) — decide whether to exectue actions
The Rules Engine can invoke actions with the transformed data from each message. The actions I am using for my project are:
DynamoDB — writes data to a DynamoDB table
Lambda — invokes a Lambda function with the transformed data
For full list of rule actions see AWS IoT Rule Actions.
That’s enough theory for now. Let’s take a look at how we set this up with the Serverless Framework.
In the Serverless Framework, serverless.yml is the main configuration file for a Serverless Service. The serverless.yml configuration file defines the functions and resources in the service. Resources are CloudFormation Resource types written in YAML rather than JSON.
For the sake of this example, I have broken the configuration file for my project into three gists.
The two key parts to note are the variableSyntax property and *LambdaInvokePermission *resource.
The variableSyntax property allows developers to changes the syntax for referencing variables in serverless.yml. I have changed variable syntax to allow the use of IoT Sql Functions e.g. ${timestamp()}.
The LambdaInvokePermission *resource grants the AWS IoT service access to the *checkMoistureLevel function. Don’t forget to add this or you’ll be in for a bad time.
The next step is to define a DynamoDB table to store the moisture data. I need to store the device that sent the message, the message timestamp and the moisture level.
I am using the device id (ClientId) and the timestamp as the keys for this table. This allows me to query DynamoDB for messages from a particular device. You can read more about how to do this in my earlier post GraphQL with the Serverless Framework.
The last step is to define the AWS IoT services. The following code defines:
An IoT Thing and policies — for connecting devices to AWS
IoT Role — to define permissions for the IoT service
IoT Rule — to store data in DynamoDB and invoke a Lambda
As I wrote earlier, the Rules Engine is the brain of this project. The SensorThingRule stores all moisture levels in DynamoDB. This provides the data for the moisture level dashboard. The SensorThingRule also invokes a Lambda function on each message. This powers the notifications system that alerts me when the moisture level is too low.
That’s it for the cloud services. The final step is to look at the devices.
This is where I must make a confession. I have not been able to finish this project as I have had hardware issues.
NodeMCU is a firmware and development board for IoT projects. I purchased a NodeMCU based development board for this project.
The NodeMCU firmware allows you to control your device with the Lua programming language. The firmware includes standard libraries for networking and sensors.
The development board is an ESP8266 based board with plenty of GPIO pins for sensors. The boards were about $8 USD delivered from China. The board would have been a great option, but they have one fatal issue.
The NodeMCU does not support TLS 1.2. Without TLS 1.2 support I cannot send messages from the NodeMCU to AWS. I may be able to use an alternative firmware, esp-open-rtos. But, I have not been able to try this yet.
While I have been unable to create a hardware device, I have been able to test the IoT service. I created a small Node program to connect to the AWS IoT Device Gateway and publish fake levels.
This has allowed me to develop the system without having a working hardware device.
I am determined to finish this project. I have recently bought new hardware that I hope to use to finish the project. I will write about the devices in detail when I have a working solution.
If you want to learn about more about GraphQL and the Serverless Framework try this video course that covers both in-depth. For more on the AWS IoT service you can read the docs.
I hope you have enjoyed reading about this project. If you liked this article, follow me on Medium or Twitter for more great content.