Authentication and Authorisation
UPDATE: Serverless 1.0 was released earlier this year. There are a lot of improvements in v1.x. I suggest you go and read the docs for the most up to date information.
In Part 1, Part 2 and Part 3 of this series, we have taken a simple Express app and converted it to the Serverless Framework. This has given us a good grounding in handling Requests and Responses with API Gateway and AWS Lambda. Most real world apps need to protect services they provide, so the next step is to look at Authentication and Authorisation
There are many different authentication and authorisation techniques. For our purposes we are going to use username / password authentication and JSON Web Tokens (JWT) for authorisation.
Express JWT by Auth0 is an Express middleware library that validates JWT’s. I’ve added this middleware to our *foo *endpoints to protect those endpoints from unauthorised users.
var express = require('express'),
    **jwt = require('express-jwt'),**
    config = require('./config.json');

var app = module.exports = express.Router();

app.use('/foo', **jwt({ secret: config.auth.secret })**);
To issue JWT’s we need to use another library by Auth0, Node JsonWebToken. I have added two new endpoints, a registration endpoint /users and a login endpoint /sessions/create.
var express = require('express'),
    config = require('./config.json'),
    **jwt = require('jsonwebtoken');**

var app = module.exports = express.Router();

function createToken(user) {
  return **jwt.sign(
    user,
    config.auth.secret,
    { expiresIn: 60*60*5 }
  );**
}

app.post('/users', function(req, res) {
 // register user in db and issue token
 ...
 res.status(201).send({
   **id_token: createToken(user)**
 });
});

app.post('/sessions/create', function(req, res) {
  // validate username / password and issue token
  ...
  res.status(201).send({
    **id_token: createToken(user)**
  });
});
To convert our updated Express app to Serverless, we need to add Authentication endpoints and Authorise requests to our API Gateway endpoints. Our Authentication endpoints will build on what we’ve learned in Part 1, Part 2 and Part 3 of this series. Adding Authorisation to our existing foo endpoint is a new concept.
The first step we need to take is to add three new functions. The user/post will register users with our system. The sessions/create function will authenticate users with our system. The authorization function will authorise access to our foo function. We need and endpoint for the users/post and sessions/create functions, but not for authoriztion function.
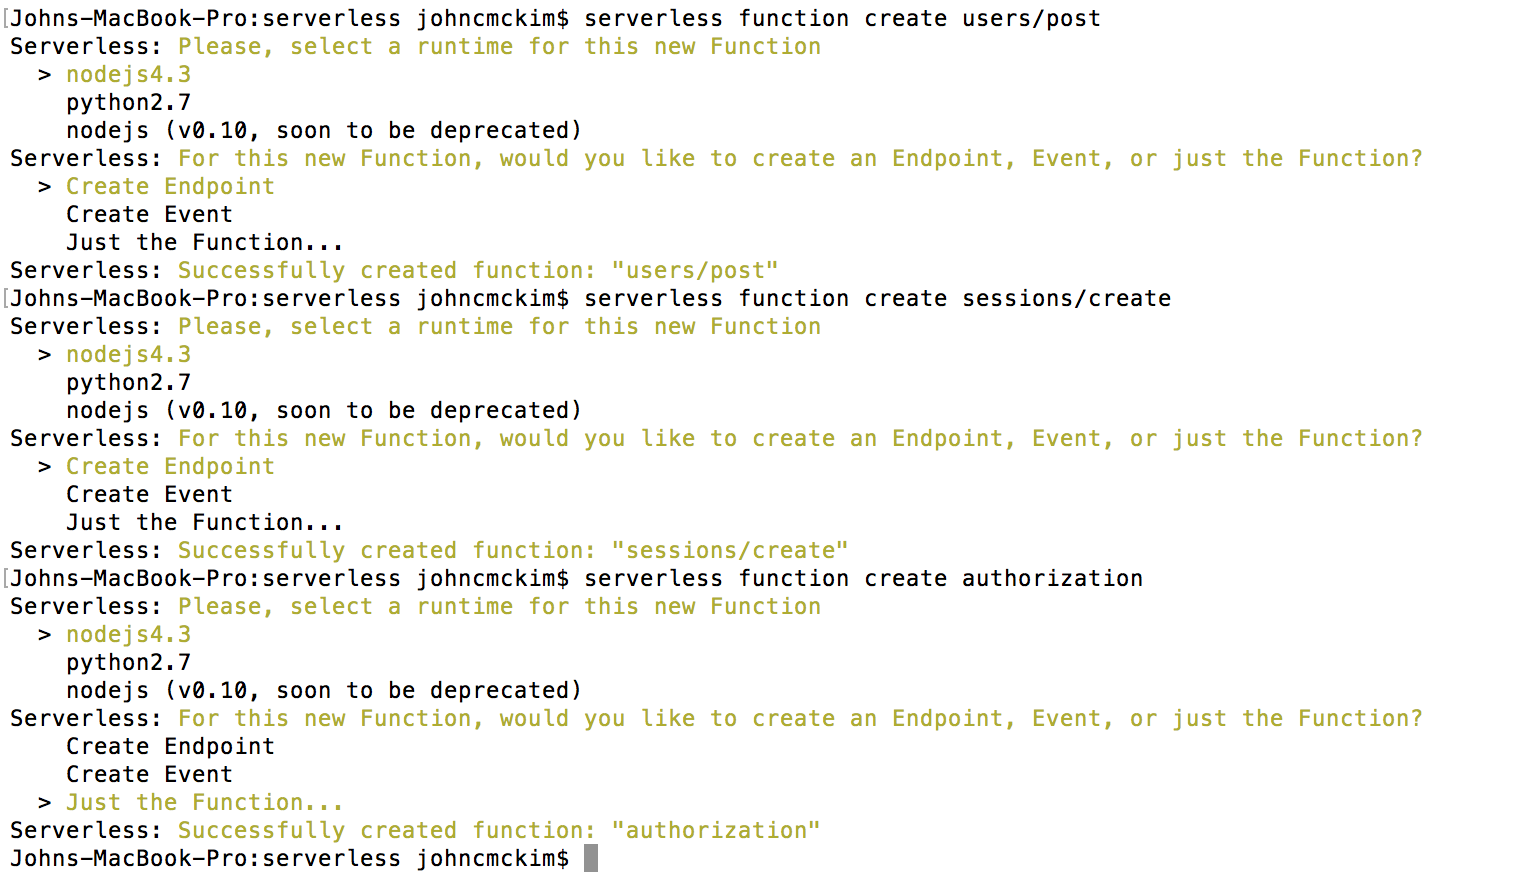 Creating the functions with serverless
Once we have added our functions, we should see the following files added to our project.
authorization
  |__event.json
  |__handler.js
  |__s-function.json
sessions
  |__create
    |__event.json
    |__handler.js
    |__s-function.json
users
  |__post
    |__event.json
    |__handler.js
    |__s-function.json
We’ll start by updating the s-function.json configuration file of our authorization function. We need to update the authorizer property as below.
{
 "name": "authorization",
 "runtime": "nodejs4.3",
 ...
 "**authorizer**": {
   **"type": "TOKEN",
   "identitySource": "method.request.header.Authorization",
   "authorizerResultTtlInSeconds": "0"**
 },
 "endpoints": [],
 ...
}
The next step is to update the s-function.json configuration file of our foo function. We need to update the endpoints to use our authorization function as below.
"endpoints": [{
 "path": "foo/{id}",
 "method": "GET",
 "type": "AWS",
** "authorizationType": "CUSTOM",
 "authorizerFunction": "authorization"**
 ...
},{
 "path": "foo",
 "method": "POST",
 "type": "AWS",
 **"authorizationType": "CUSTOM",
 "authorizerFunction": "authorization"**
 ...
 }
]
The next step is to update our user/post, sessions/create and authorization handlers.
As in our Express app, the user/post, sessions/create endpoints need to issue a JWT. Below is a snipped of the sessions/create handler. This function finds the user by username and issues an id_token if the username and password is correct.
var _ = require('lodash'),
    token = require('../../lib/token'),
    users = require('../../lib/users');

module.exports.handler = function(event, context, cb) {
  var username = event.body.username,
      password = event.body.password;

  users.getByUsername(username)
    .then(function(user) {
      if (user.password !== password) {
        cb("The username or password is incorrect");
        return;
      }

      **cb(null, {
        id_token: token.createToken(user)
      });**
    })
    .catch(function(err) {
      cb("The username or password is incorrect")
    });
};
Once we have issued the JWT, the client can use that token to access our foo endpoints. The client sends the JWT to the endpoint in the Authorization *header using the format *Bearer myJWTxxxx.
The next step is to update our authorization function to verify the JWT and return an IAM Policy. The IAM Policy returned by this function will determine what resources the user can access.
var jwt = require('jsonwebtoken'),
    config = require('../config'),
    AuthPolicy = require('./authPolicy').AuthPolicy;

module.exports.handler = function(event, context, cb) {
  // **Bearer xjklisfe3jfdslsdf....**
  var tokenParts = **event.authorizationToken.split(' ');**
  if(tokenParts.length !== 2 || tokenParts[0] !== 'Bearer') {
    console.log('Invalid auth token: ', event.authorizationToken);
    return context.fail('Invalid token');
  }

  var options = {};

  **jwt.verify(**
    **tokenParts[1]**, // xjklisfe3jfdslsdf....
    **config.auth.secret,**
    options,
    function(err, **verifiedJwt**) {
    if(err) {
      cb("Unauthorized");
      return;
    }

    // parse the ARN from the incoming event
    var apiOptions = {};
    var tmp = event.methodArn.split(':');
    var apiGatewayArnTmp = tmp[5].split('/');
    var awsAccountId = tmp[4];
    apiOptions.region = tmp[3];
    apiOptions.restApiId = apiGatewayArnTmp[0];
    apiOptions.stage = apiGatewayArnTmp[1];

    **// AuthPolicy was taken from [AWS Blueprint](https://github.com/awslabs/aws-apigateway-lambda-authorizer-blueprints/blob/master/blueprints/nodejs/index.js)
    var policy = new AuthPolicy(**
      **verifiedJwt.username,**
      **awsAccountId,
      apiOptions
    );**

    // Allow user access to all methods
    **policy.allowAllMethods();**

    cb(null, **policy.build()**);
 });
};
The event.authorizationToken property contains the Authorization header from the request. We configured this earlier using the identitySource property in the s-function.json configuration file. We need to split value of this property to separate the token from the token type. Once we have the JWT we can verify the token and return an IAM policy if the token is valid.
The IAM Policy returned by the authorization function controls access to all the protected API Gateway resources. See an example below.
{
  **"principalId": "xxxxxxx",**
  "policyDocument": {
    "Version": "2012-10-17",
    "Statement": [
      {
        "Effect": "Allow",
        "Action": [
          **"execute-api:Invoke"**
        ],
        "Resource": [
          **"arn:aws:execute-api:us-east-1:xx:xx:/dev/*/foo/*"**
        ]
      }
    ]
  }
}
In our authorization function we’re using a class created by AWS to build our IAM Policy. The [AuthPolicy](https://github.com/awslabs/aws-apigateway-lambda-authorizer-blueprints/blob/master/blueprints/nodejs/index.js) class is part of the AWS Blueprint example code up on Github.
In Part 2 and Part 3, we used automated testing to test our HTTP endpoints. To test our changes I updated the tests to send a requests to our foo endpoints with and without a valid Authorization header.
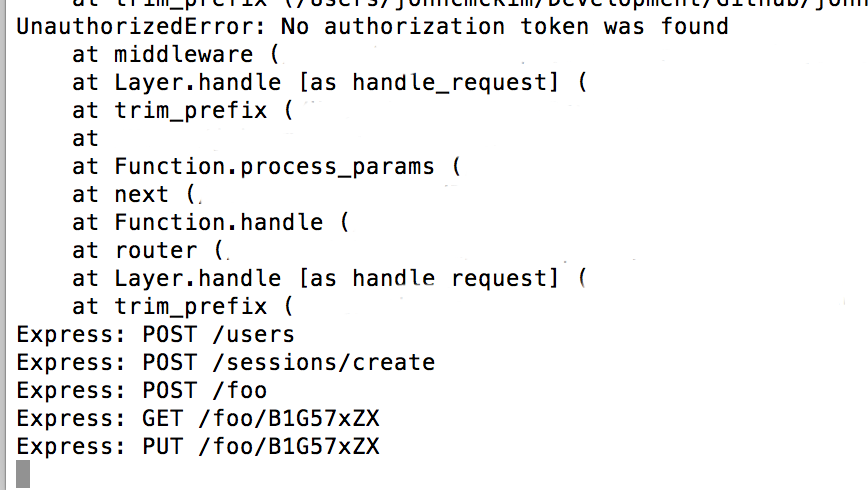 Express console during testing
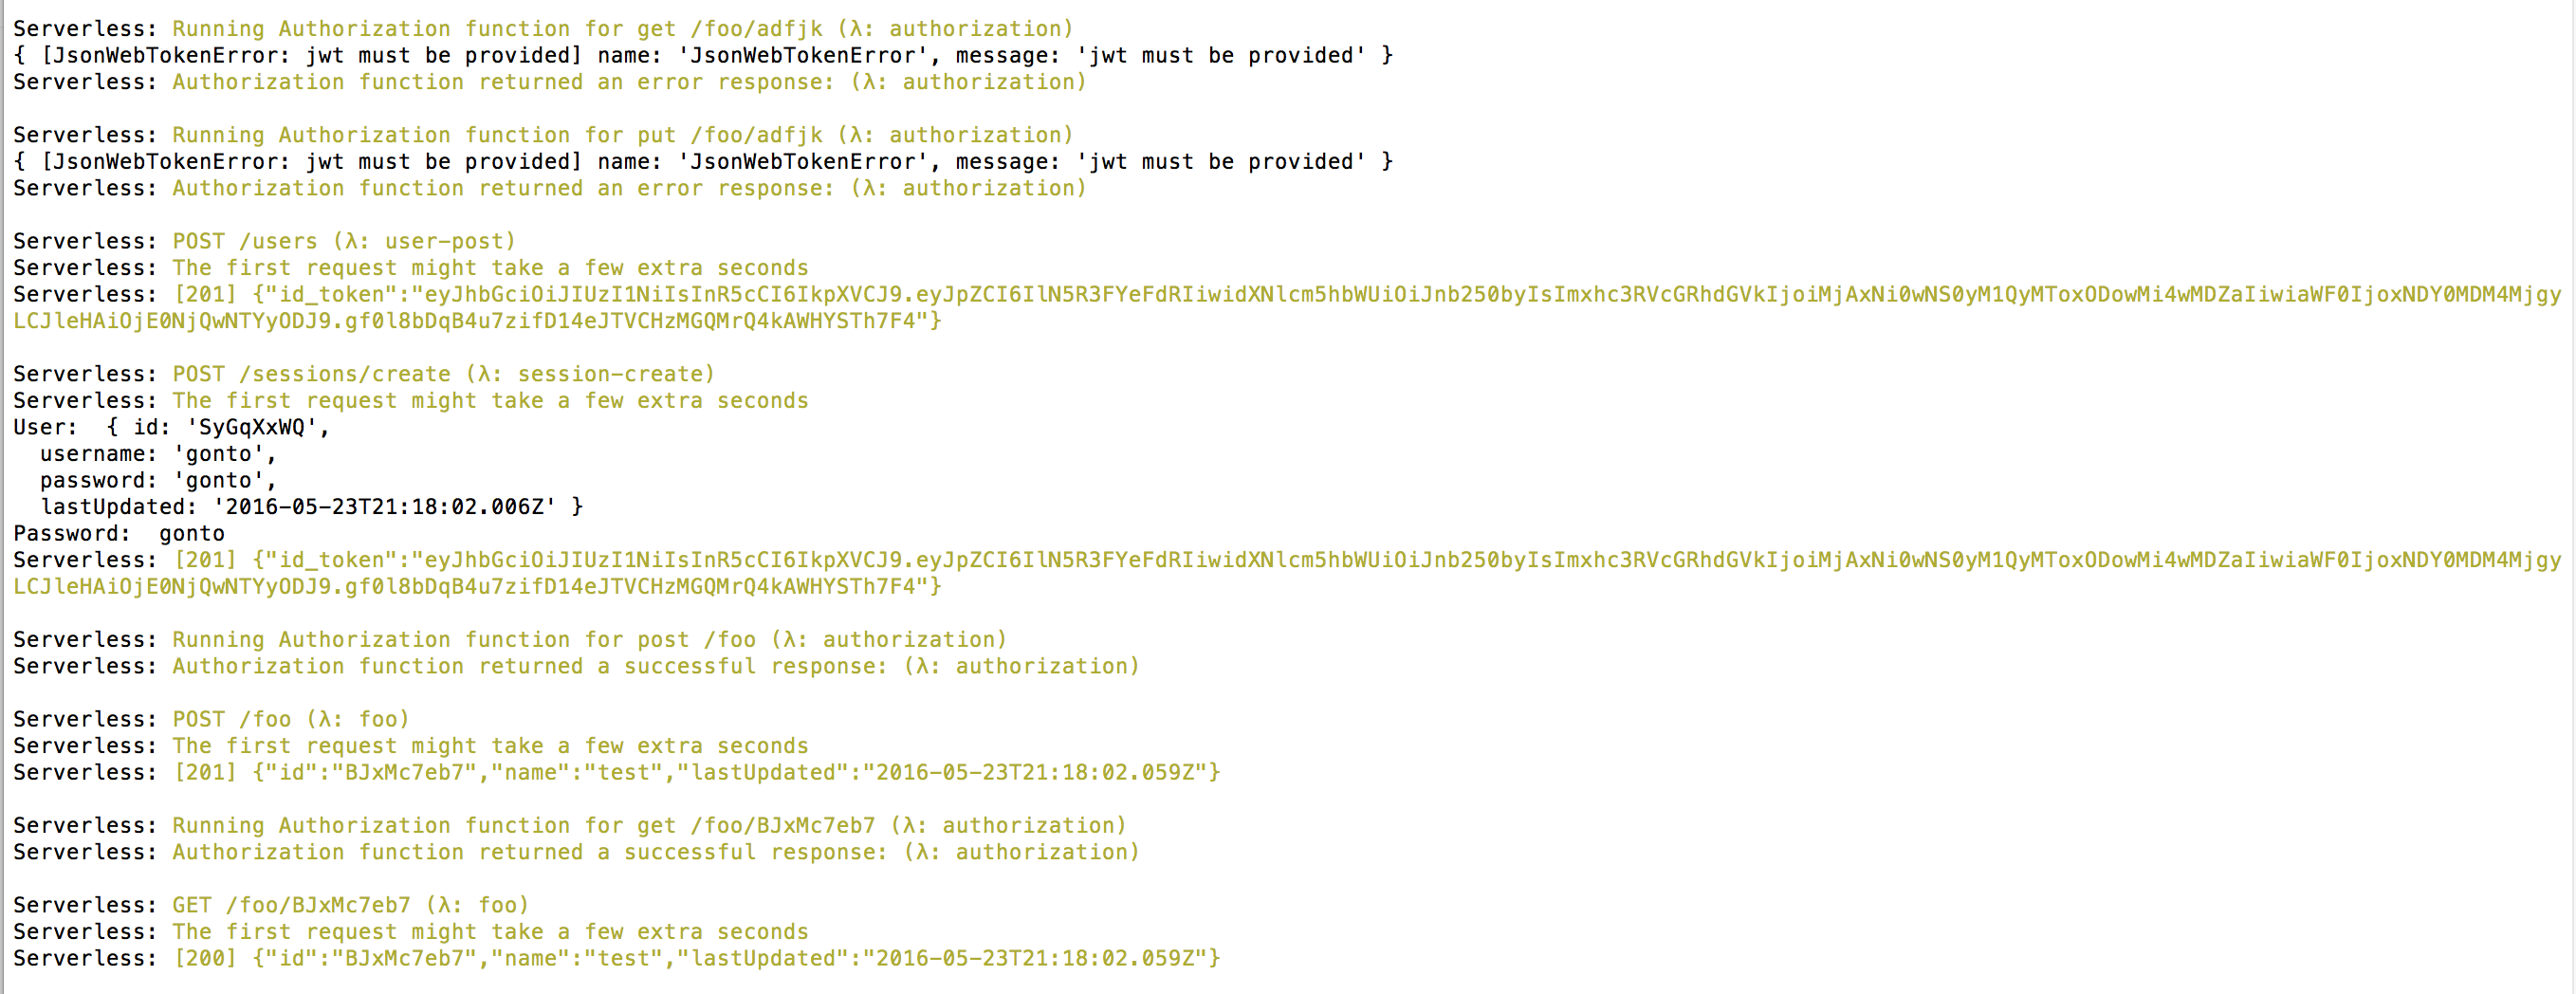 Serverless offline during testing
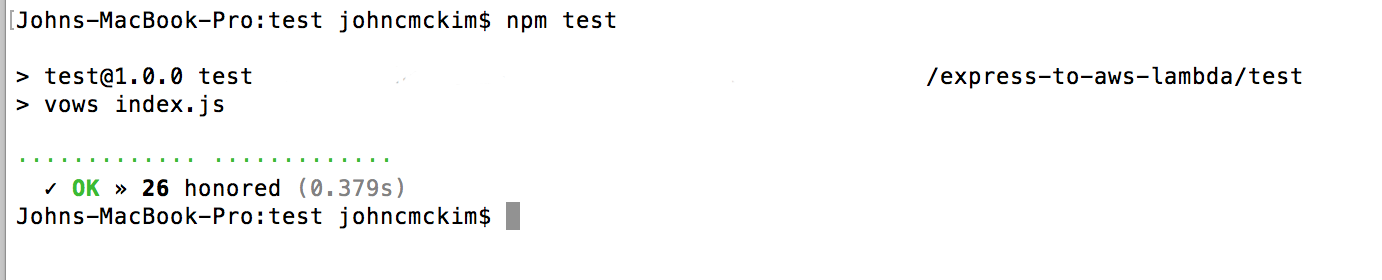 Test results
Serverless offline has limited support for authorisation functions. There is an open issue on Github tracking support for this feature.
To learn more about API Gateway Authorizers I suggest reading the blog post announcing the feature and looking at the Blueprint on Github. Creating your own authentication system can be difficult, I suggest reading the Auth0 API Gateway Tutorial and reading the AWS Startup this blog post on API Gateway security.
Response Templates brings us one step closer to converting a real world app to Serverless. However, there is still more to explore.
We haven’t covered:
I will cover those issues in future posts. If you want to explore this example more in the mean time, please check out the repo on Github.